Friday, October 14, 2011

Scripture Cover

I have been wanting to make a cover for my scriptures ever since I saw the tutorial on Delia Creates.  But I wanted to make it my own ... no handles & I love how my husbands scriptures have a flap to protect the pages.  So I made my own pattern.  

Now for the disclaimer ... I am not a seamstress - so for all of you who are please have patience with me.  I have learned a lot with this project.  I have used interfacing for the first time, made my first buttonhole (without a special attachment I might add), and applied a snap button.  A lot of firsts for me. :)

You can click on a link at the end of the tutorial to get the patterns - but these patterns are for a book that measures 5 7/8"x 4"x 2 1/5" .  If you want to make your own pattern you can - I traced my scriptures laying flat on a piece of paper - I then measured and squared everything up.  I added 3/4" to the outside of my pattern but I sewed everything with a 1/2 inch seam allowance.
1. Pick out the colors - find two colors that compliment each other - I purchased 1/2 yard of each color and 1/2 yard of interfacing that can be ironed onto the fabric
2. Cut everything out:
Main pattern - 2 interfacing pieces, 1 main color, 1 secondary color
Cover sleeve - 1 interfacing & 1 main color
Cover sleeve w/flap - 1 main color
Pen area - 1 main color
Interfacing for cover sleeve w/ flap - 1 interfacing
Strip for secondary color - 1
Strip for interfacing that will be used with secondary color
3. Take the pen area and iron 1/4" seam on the top and stitch into place.
4. Now iron each of the sides over by 1/4" (I do not stitch them down).  I then pin the pen area into place on the cover sleeve w/flap. I used the pattern as a guide.
5. I know the picture doesn't show it really great but the bottom of the pen area lines up with the bottom of the cover sleeve w/flap and I stitched down each side of the pen area.
6. I then ironed the interfacing onto all of the pieces except the secondary color strip - I'll explain that next.
7. Take the secondary color strip and iron 1/4" on the long sides.
8. I then ironed the interfacing - I did this because it gave the strip strength and more stability for me to sew. The first time I did two colors I didn't do this and as I sewed the strip onto the main color it created crinkles.
9. Sew the strip to the main color/main pattern and trim ends & set aside.
10. Iron and stitch a 1/4" seam on both cover sleeves 
11. Pin the cover sleeves to the main secondary color & set aside.
12. Now take the 2 main sections and pin together with the wrong side facing out.
13. Now when it comes to sewing I started on one of the edges of a cover sleeve and went around the whole thing I then stopped at the edge of the other cover sleeve leaving small opening so I could turn it inside out.  Now I backstitched the opening so they didn't come undone when I turned the fabric inside out.  As you can see from the picture I also trimmed the corners so the corners would be crisp.
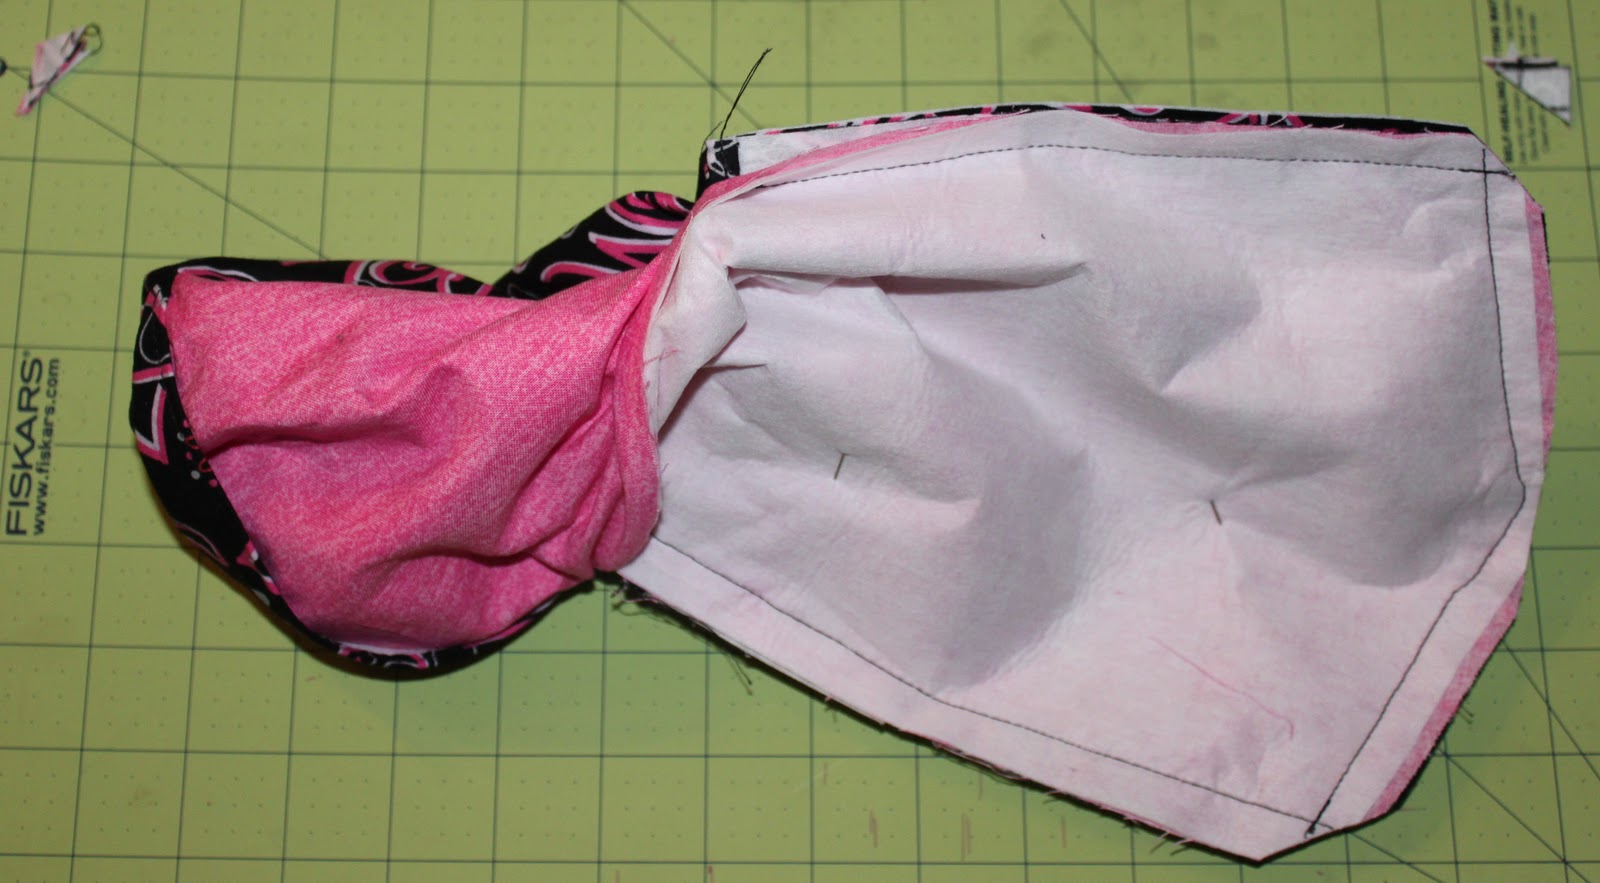
14. I turned the fabric inside out and removed the pins holding the sleeves on very carefully.
15.  I then ironed the whole cover and topstitched around it to make the edges look nice and seal the hole.
16. I tested to make sure my scriptures fit and mark where I wanted the button.
17. I added a buttonhole to this scripture cover and I like the button but it does make it a little difficult to get into your scriptures. I centered the button and marked the ends with pins
 18. As you can see I drew a line so I could remove the pins. 
19.  I did two large zig-zag stitches on the ends and small very close zig-zags along the line.  Then I used my seam ripper to cut into the fabric and I had my buttonhole. :)  I then sewed the button to the other cover sleeve and I was done.

To access the patterns click on the pattern link on the right side of the page.  You will be directed to a website where you can download them.  Print them out and cut out.  Those that have to be taped together will have stars to show where they need to match up.

Here are the three scripture covers that I made:


By the end I changed what I was using to close the scripture cover.  I tried a button snap - this damaged my scriptures, I tried velcro and this did okay as long as I had a big enough piece, I also tried the button/buttonhole combo and this did really well but it takes a lot of effort to close and open.  I shared my frustration with my 8 year old son and he simply stated I should use magnets--so I added strong magnets in between the fabric and I love this.  You can also buy cute magnetic purse closures at your local craft store.

I hope you enjoy this tutorial...let me know if it worked for you.

Wednesday, September 28, 2011

Ty's Butterfly

My grandson Ty and I found a monarch caterpillar when we were fishing.  We brought it home and it became a chrysalis   He was so excited but he had to move eight hours away so he let me keep it here so it wouldn't get broken.  I promised to take pictures.  Last night while I was sleeping the butterfly decided to emerge.  Since I was a little girl I've always wanted to release a monarch butterfly....It was awesome!!!!


Friday, September 16, 2011

AWOL

I've been AWOL in the designing and quilting world for the last few months.  I've been enjoying the summer and the sunshine.  I've managed to paint all the outside trim of my home and changed the front door from white to blue.


My Arizona Grandbabies came to visit for a few days which was awesome.  The cousins loved playing together.  

They were tired after a busy day of playing and hiking.

We spent the day exploring the Flaming Gorge Dam.

My husband and I also went fishing a couple times.  We haven't really caught anything but we have really enjoyed the scenery.

I found this little fish on the bank.  The river had dropped 4 feet and this little guy had been left on the bank.  I was able to get him swimming again.

We had a great day fishing with my daughter-in-law and two of my grandbabies.  We found a monarch caterpillar, a small brown bat that had died on the rocks and some cool rocks.  My granddaughter spent the day building sand castles.  My husband was the only one that caught a fish but it wasn't big enough to keep.


So needless to say I haven't done much in the designing and quilting department.  One of my granddaughters is getting an American Girl Doll for her birthday.  So I made the doll a sleeping bag out of minkee.  I was able to design it in such a way that I only had one seam to hem.  It was fun to get back into it.  I don't have a doll so a stuffed moose made a good model.


Thursday, May 19, 2011

Fun Cupcake Pattern

This is a fun pin cushion kit created by Valerie Burton of Cookie's Creations.  She uses a silicone cupcake holder, texture magic from Superior Threads and fun items to personalize the cupcake.  The kits include everything you need but the glue.  She also sales the pattern so you can create as many cupcakes as you would like.
Here is what is included in the kit:
  

Here is my completed cupcake:


Here is a link to Valerie's website:  www.cookies-creations.com

 Have a fun quilty week!!!


Tuesday, May 17, 2011

International Quilt Market

I attended my first quilt market in Salt Lake City, Utah.  I went to Sample Spree and then spent all day Friday at the vendors.  Sample Spree was crazy...people were lined up for three hours and when they opened the door it was crazy...everyone ran for the Moda table and was grabbing fabric like it was going out of style...lol

I was able to meet Pat Sloan, Jim West, Patrick Lose, Annie Smith, and Alex Veronelli.  I saw Eleanor Burns and Jinny Beyer.

I learned a lot and was able to get some good feedback on my patterns.  Here are some fun pictures:

Aurifil Thread had a contest on Facebook where we submitted names for their new variegated thread.  One of my names was chosen.  It was a yellow variegated thread and I named it Golden Glow so Alex wanted a picture with me since I was one of the winners.


I won some more Aurifil Thread because I completed a vendor shop hop...woo hoo!!!!


My favorite booth at market was the Riley Blake booth.  It was cute and very clever.


Market was only a block away from Temple Square where the Salt Lake Temple of the Church of Jesus Christ is located.  Here are some beautiful flowers from Temple Square.


My husband and I went and ate at a fun restaurant called the "Blue Lemon" as we walked out of the restaurant I saw the spires of the Temple peeking over the roof tops with a beautiful blue sky as a back drop.  I had to snap a picture.

 I hope you have a wonderful quilty week and all your fabric dreams come true!!!!
Jenice


Wednesday, May 11, 2011

HMQS Quilt Show

On Saturday Kevin and I attended the HMQS show in Salt Lake City, Utah.  As always there were many beautiful quilts and fun vendors.  I will post later about my purchases.  I wanted to share some of the beautiful quilts that were there.  I only took a few pictures and didn't want to pay $30.00 for the cd of the quilts.  I put my Snowman Quilt in the show to get some judges feedback.  I haven't received the feedback yet since they forgot to put it in with my quilt.  I will let you know when I get it.
Sue Garman had one of her quilts there and she received a ribbon...of course...she is a very talented lady.  
The first quilt was made by Curtis W. Hathaway.  He is 72 years old and this is first quilt.  The quilt was inspiried by Pam Holland's book "1776 Quilt"  This quilt was awarded a ribbon.
 This Quilt is called, "A Simple Touch and was made by Pat Rollie.  She received a ribbon as well. The piece was painted with reactive dyes and highlighted with raw edge applique, silk ribbons and wool.  Beautiful Piece!
 This quilt is called "David Loves Janie: by Joan Musick.  When her father died her mother was going through papers and found a birthday card that he had given her years earlier so Joan made a quilt from that card.  No ribbons but I loved it.
 This is called "My Buddy and Me" and is Barbara McKie's first art quilt.  It is a photograph on fabric that she has quilted.  The seals look so real.  She received a Teacher's Choice ribbon.
 This quilt is called, "My Stars in the Night" and is quilted by Jill Bennet and constructed by Peggy Gelbrich.  I love the colors on the black background.  This quilt was foundation paper pieced using freezer paper and Jacqualine de Jonge of Be Colourful Designs.
 This quilt received two ribbons.  It was made by Rose-Clair Fletcher.  It is a video screen capture of her granddaughter. Her granddaughter wad crawling under the porch and said, "Ooo those spiders will make me a robot?"  This piece has fused applique, painting with fabric dye and longarm thread painting.
 This quilt is called Pharaoh's Fan by Shari McDonnell Guimont and quilted by Norma Riehm.  The original design is by Claudie Clark Myers.  No ribbon but beautiful intricate work.
 This quilt is called: "Snapshot:  Snannon's Bantam and was made by Denise Havlan.  She painted, machine embroidered and quilted this quilt.  The shorts were made from real denim material and the cuffs were actually rolled up.  One of my favorite quilts and a ribbon winner.

 This is Sue Garman's quilt called "Lily Rosenberry and was quilted by Denise Green.  This quilt received a Judge's choice ribbon.  Beautiful detail the picture doesn't do it justice.